20 Ways to Use ThingLink in Education

When I first learned about ThingLink late last summer, I was immediately impressed. My mind started racing about all the ways that ThingLink could be used by teachers, students and even beyond the classroom. If you’re not familiar with ThingLink, it makes images interactive. How do you make an image interactive? You upload a still image to ThingLink, and then you can add little icons on top of the image. Those icons become hyperlinks to other web media- websites, articles, videos, sound clips, and much more. Not only can you link to external content, but students can type their own responses onto an icon. I’ve embedded a ThingLink featured example by Molly below, so you can see it in action.

Now tell me that isn’t AWESOME?!

So, now that you’re hooked, what are some of the ways you could use ThingLink in your classroom? I’ve just included the tip of the iceberg below; the ideas are truly endless.

  1. Have students create one for a summative assessment in place of a typical test.
  2. Use a book cover image and have students include links about the book, characters, plot, etc. for an end of book project.
  3. Use the image of a map, and include links with information about the area, like this one, or this one, or this one.
  4. Use an image of a person or character and include links about their life and their important contributions to history or the topic being covered.
  5. Include an image of a body system and include links about how it works. For example, the skeletal system.
  6. Foreign language teachers (or ESL/ELL classrooms) could use an image of a familiar scene, like a family cooking in the kitchen, and include links to recorded sound clips about what’s going on in each part of the picture in the language being studied.
  7. Create a “getting to know you” ThingLink using a group photo and include links to teacher’s websites, bios about seniors for senior night, etc.
  8. Use it as a beginning of the year/course ice breaker by having students upload a picture of themselves and including links to content that describes them and things they like. Students can comment on one another’s published ThingLinks.
  9. Search the database of ThingLinks others have created and shared to see if there’s already something out there you can use.
  10. Create an entire lesson in one ThingLink, by including links to sound clip instructions, video content and links to assignments or quizzes.  See a great example here.
  11. Use the image of a book cover and include a video link to the book trailer to preview the book before reading it.
  12. Scan and upload an image of a worksheet, and include links to videos and websites that will help them solve the problems/answer the questions if they get stuck.
  13. Have students create a portfolio by linking to their work in all other webtools you use in class: blog posts, videos they created, scanned images or pictures of non-digital work.
  14. Depending on how big your school is, you could create and upload a map of your school. Then include a link over each classroom to information about that teacher, like their Twitter handle, class website, class LMS page(s), a written bio right in ThingLink, a recorded welcome sound clip from that teacher, etc.
  15. Create an image collage, upload it to ThingLink and then include links about each image. For example, you could create a collage of different geographic land forms like this one.
  16. Upload a picture of the periodic table of elements and include a link to a video or information about each element (or the ones you’re studying at the time). Sort of like the Periodic Videos site.
  17. Include links to videos demonstrating how to preform certain skills, like this push up example.
  18. Upload an image of your school and include links to information and videos about your school: clubs and activities you offer, your mission statement, academic offerings, promotional videos, and more. Then embed it on your school’s website!
  19. Put a twist on Friday’s current events discussion by asking students to not only find an article, but find an image that relates to their chosen event/topic, upload it to ThingLink, include a link to the original article as well as other links, videos, etc. that relate to the article and what you’re studying in class. You could even ask the students to include a link to an audio recording of themselves discussing their current event.
  20. Create instructions for a new website, device, or process like this one.

One of the things I like the most about this tool, is that no matter the project or access to technology, you can incorporate ThingLink into your class. You, as the teacher, could create one that students will use to preview/review information or complete an assignment. Students could work in groups or on their own to create one, depending on their access to technology and devices inside and outside of the classroom. If you have very little access to technology in your classroom and you still want students to create their own, you could assign individual students or groups pieces of the project to research and prepare. Then have the groups take turns adding their links to the full class ThingLink image. As you can see with how all over the board these ideas are, there are so many ways you could use this tool in an educational environment.

How are you using ThingLink with your students and in your schools? If you’re using it, please share a link to an example in the comments.

Tech To You Later!
-Katie

6 Tips for Teachers on Social Media in a Connected World

There’s no hiding from it anymore.  It’s either already sucked you in, or it’s coming for you. There’s even an entire huge initiative and month dedicated to using it to connect you with other educators around the world.

Social media may evolve and change over time, but it is here to stay.

social media (2)So, if you’ve resisted joining any social media sites (or using them professionally) until now, you can stop running from them… this isn’t the Walking Dead: social media apocalypse. All kidding aside, there are some things professionals should keep in mind when using social media, especially educators because we are always held to a higher standard in the public eye. I mainly use Twitter for my PLN, but these tips can apply to any social network.

  1. Don’t be afraid. Being cautious and smart is different than being afraid. If you’re afraid to even get started and sign up, or once you sign up you’re too afraid that something bad will happen to use the account at all, you will never fully understand or benefit from it. I’m not saying be willy nilly and don’t give anything a second thought before posting, following or ‘friending’. Just be open to it, give it a try, and don’t over think everything that you’re keeping yourself from ever posting or connecting with others.
  2. Only post things you wouldn’t mind showing up on the home page of your local newspaper… or the New York Times. It’s way too easy to fire off a tweet or Facebook post in a fit of anger when you’ve been wronged. It’s also very easy to post a status or picture that was funny in context with a small group, but wasn’t the best thing to post on the internet for all to see. Some things should still be kept private among a group of friends. You don’t want to be the next negative educator headline, so make sure you are using your absolute best judgement.  Actually, think of the most responsible person you know who always makes the right decisions.  Use their absolute best judgement. If the thought I wonder what Suzy Q will think of this or will anyone think this is inappropriate crosses your mind, then don’t post it. Remember, this includes things you “like,” favorite, retweet, share, are tagged in, etc.
  3. Think long and hard about setting up a separate professional account or not. My personal recommendation is to have a separate account. Remember, I mainly use Twitter, so that’s what I’m referring to most here. It is actually against the terms and services to have a separate Facebook user account, which is why I really don’t use it professionally. I understand the argument for being transparent and not separating accounts, but sometimes I just want to keep my personal life separate from work. My family and friends don’t care about the latest formative assessment web tools and my PLN does not care about who’s wedding I’m in or attending this weekend. If you decide to go with two separate accounts, the newspaper headline tip applies to both accounts equally. I’m not telling you which way to go here, just telling you my personal belief and suggestion.
  4. Post about your subject area, your school, your class, education and teaching in general, etc. Remember you’re trying to use social media as a professional tool and resource.  I’m not saying it’s never okay to share some personal stuff, but you’ll build your PLN much faster if you’re talking about stuff other like-minded educators care about on a regular basis. You also want to make sure you’re talking about these things in a positive way. Talking about a great program your school is putting on next week is an awesome way to use social media.  Talking about how poorly run the faculty meetings are at your school is a terrible idea.  That being said, the point of your PLN is to share ideas, resources and get some help on different issues when you need it. I would just be careful about the way you phrase those requests for help… remember the person who plans and/or runs those faculty meetings you’re displeased with may see your posts. You might ask your PLN during a twitter chat how they make the most effective use of their time together in faculty meetings or ask if anyone has had success flipping faculty meetings to take ideas back to your building.
  5. Boundaries still apply. Be careful not too blur the lines of educator and student/parent relationships if you use social media to communicate with students and parents (which is one of the great reasons to use social media, but not the only way you can use it professionally). This is one that you’ll have to use that responsible person’s judgement from tip #2 again to be your blurred lines guide.
  6. Make connections and grow your PLN. I go back to tip #1- don’t be afraid. Don’t be afraid to reach out to other educators on social media that you may have never met in person. Find other teachers who teach the same subject or grade level as you or other administrators in your position and add them to your PLN. Request to connect with them; accept when they ask to connect with you. Try participating in a Twitter chat (you can just lurk the first time to get comfortable)- this is where the power of using Twitter professionally comes from, in my opinion.  Try searching Twitter for a hashtag or chat that relates to your subject/grade to help you find some people to follow.  If someone is using an abbreviation or hashtag that you’re unfamiliar with, ask them what it means. Connect, ask, share, grow.

Aside from the tips above, I do recommend educating yourself about best digital citizenship practices beyond these six tips. If you’re looking for ideas on how to incorporate social media into your professional lives (especially school administrators), I recommend reading Eric Sheninger’s Digital Leadership and checking out my Twitter resources. And of course, don’t forget to connect with me!

What other tips do you have for educators on social media?

Tech To You Later!
-Katie

District-Wide 30 Day Twitter Challenge

In honor of Connected Educator Month, I will share what I have been meaning to write about for a month now… getting teachers connected on Twitter!

Twitter ChallengeIn August, I led a couple of optional, face-to-face trainings on Twitter for teachers and principals in my district. Most of the resources I used for the trainings can be found on my site. (Hint: TodaysMeet worked out great to have people paste their twitter handles and follow each other during the training!) I know Twitter can be confusing to people at first, so I tried to think of a way that would encourage teachers to further learn about and actually use the powerful networking tool once we left as a group.

I thought a 30 day Twitter challenge would be the perfect way to encourage the use of Twitter and make sure teachers continued to network with teachers in other buildings in the district and with educators outside of our district. I assumed I would be pleased with the results because after all, once you can convince an educator to open their mind to Twitter they’re pretty excited about the sharing going on. I never expected to be as impressed with the connections being made as I was.

To prepare, I did a quick search of the hashtag we used to make sure no one else was using it and compiled a list of challenges for each day in a Google Spreadsheet. Challenges consisted of things like following other educators who teach the same subject, sharing a favorite resource for the classroom, and other quick, easy tasks. At the end of each of the trainings I told the teachers and principals about the challenge and that it would be starting the following week. Once it had begun, I tweeted the challenges each morning and afternoon.

Actually, I have a confession to make. I scheduled all of my challenge tweets ahead of time in Tweetdeck! This helped me make sure I didn’t forget to send it one morning. It was that easy to get started, and it took on a life of its own.  As the challenge progressed, I noticed participants tapering off, which was expected. But as they stopped completing my daily “challenges,” I noticed they kept tweeting on their own and began using Twitter with their students, staff and for their own PLNs… EXACTLY what I hoped would happen! Many teachers joined in on the challenge after it started or created their own Twitter accounts because someone in the challenge encouraged them to participate, and they heard that others were having fun with it. I made a Storify to summarize the challenge and share with others.

To implement your own challenge, here are my suggestions:

  • Lead a face-to-face training first. People feel more brave and willing to step out of their comfort zone when they have a buddy (you!) by their side. This will show them the ropes and get them comfortable following people and sending tweets.
  • Create a list of tasks that are very simple, and will only take seconds to minutes to do. Our to-do lists are already out of control, so no one wants to sign up to do something that’s going to take a long time, every day, for an extended period of time.
  • Tasks should encourage participants to learn a new aspect of Twitter, make new connections or share new resources.
  • Include a task that encourages participants to get their “classroom neighbor” to join, so others who did not attend your initial training can start Tweeting.
  • Include a task that encourages participants to check out a Twitter chat, so they can see the real power in Twitter.
  • Create a list of the tasks each day, so teachers can see what’s coming, complete their task early if needed or go back to catch up. I created my list in a Google Spreadsheet that I shared out by creating a shortened URL with bit.ly (see my challenges here: bit.ly/middie30).
  • Offer prizes for participants and the winners! I also created a certificate of participation for every teacher who participated (even one day).
  • If I do this again, I would probably only do 15 days. I think cutting it in half would seem like less of a commitment, and potentially encourage more people to participate.

Overall, the feedback from teachers was great, and the Superintendent was very happy to hear more of our teachers were joining Twitter! In a training I led yesterday, one of the participants shared a resource she found, “on Twitter” with the rest of the teachers in her department.  I was thrilled to hear that teachers are still actively using Twitter as a part of their own PLN and as a result of this challenge!

How have you encouraged educators to become active on Twitter?

Tech To You Later!
-Katie

A Parents’ Guide to Teens on Social Media by Liahona Academy

As I was browsing Twitter the other day, I came across this What Your Teen Is Doing On Social Media – The Parents Guide 2014 by the Liahona Academy.  I thought it was a very relevant and current guide for parents. For any teachers or schools working to build a partnership with parents to educate and raise good digital citizens, this is a great resource!

The picture below is a summary of the guide.

Created by: Liahona Academy

See the full version of the 2014 Social Media Guide

2014 Social Media Guide


How does your school help educate parents about social media and what students are doing on the web?

Tech To You Later!
-Katie

5 EdTech Tools in 5 Minutes: Episode 8

Okay… so it’s less than six minutes!  During June and July (and almost August), I put the 5 in 5 screencasts on hold.  Well, it’s that time of year again.

By no means are these five minute episodes a comprehensive overview of the tools, but it should be enough to let you know what the tool is, what it can do, and if it’s worth your time looking into and learning more about. I’m all about helping teachers save time where they can!

5_in_5This episode features the following tools:

  1. ThingLink
  2. NearPod
  3. Remind
  4. Print Friendly
  5. One-Click Timer

For the videos, the Prezis, Diigo links to all the sites featured in the episodes and more, visit my website. If you don’t want to miss another episode, subscribe to the iTunes podcast channel here.

Tech To You Later!
Katie

5 Reasons Kahoot & Infuse Learning are the Perfect Formative Assessment Pair

Formative assessment word cloudThis week we (myself and the elementary instructional technology coach in my district) are leading a number of educational technology PD sessions about many different topics for teachers to attend before going back to school.  The more I interact with some of these tools, the more I really love and swear by them to be used by any age or subject area.  Two of the tools I’m teaching this week, Kahoot and Infuse Learning, make a perfect formative assessment pair. I just had to share them!

Kahoot turns your normal questions into a fun, interactive game that kids of all ages really do love to play! It is similar to the trivia game at BW3’s; the quicker you answer the question correctly, the more points you are assigned.  To see Kahoot in action with students, watch the short video below.

Infuse Learning can be used on the fly for a number of quick questions throughout a lessons or you can save and distribute quizzes. Question options include students’ drawings, multiple choice, true/false, extended response, Lickert scale and more.  For a quick overview of Infuse Learning, watch the video below.

Below are the following 5 reasons I think these tools are fabulous and realistic formative assessment tools.

  1. Instant access to detailed results– No need to collect a bunch of papers, take the time to grade every students’ response, put the results in a spreadsheet and analyze the results yourself, and the other timely things teachers have to do to get meaningful information about students’ progress with more traditional classroom techniques. Kahoot gives you a break down of how many students responded with each answer choice after each question, allowing the teacher to address any common misconceptions on the spot. At the end of every Kahoot game, the teacher can download the results.  The results will tell you how long each student took to answer each question, their response, how many students responded correctly and incorrectly to each question and more.
    Infuse Learning results essentially tell you the same thing when you save students’ responses.  When using the quick assessment tools, you can quickly save the results to the results section and keep moving so your teaching isn’t interrupted. Being able to look at students’ responses as they come in allows you to address any errors or misconceptions on the spot.
  2. Kids are engaged and interested– I’ve seen kids at the high school level and at the grade school level have a blast with Kahoot. They will be begging you to play the game again, so they can increase their score and beat their classmates next time. If you don’t go over an explanation of the correct answers with them right away, kids will be looking up the answers on their own in between rounds of playing the game to improve their score.  The time limit keeps kids on their toes and prevents them from looking up answers as they go.  Kids enjoy Kahoot, so they stay engaged with the game, and ultimately the content.
    When using the quick assessment tools in Infuse Learning throughout a lesson, students must be following along and paying attention in order to answer.  The teacher can see the student’s responses, so it is clear who is paying attention and who may be daydreaming in the back.  The teacher can also see who has responded and who has not responded to any question, so no student can get out of answering a question.
  3. Simple to set up and navigate the teacher’s side– What teacher has time to learn another complicated tool or software?  The easier the better when it comes to saving time, and these two tools couldn’t be easier to navigate and set up. Since it shouldn’t take an overwhelming amount of time to get your quizzes set up in these tools, teachers will be more likely to use them on a daily/weekly basis.
  4. Students (or participants) don’t need to have an account & password- they will just need the room pin number provided by each site once you are logged in as the teacher.
  5. Will work on any device- this makes these tools useful in any setting: BYO, 1:1or checking out labs/carts.

So how do they go together? I would use Infuse Learning in my classroom on (almost) a daily basis to establish a routine with students (you can also import class lists and use Infuse Learning to take attendance based on students “entering” your class) and keep my lessons interactive. I would try to use the quiz feature to set up exit slips as frequently as I could.  Kahoot would come into play in my classroom for review sessions before tests and to check understanding for more complicated or dull topics that need a little spicing up to keep students interested.

What are your favorite formative assessment tools to use in todays classroom? What do you think of Kahoot and Infuse Learning?

Tech To You Later!
-Katie

5 EdTech Tools in 5 Minutes: Episode 7

It’s that time again: time for the next episode of 5 EdTech Tools in 5 Minutes.  Normally I feature 5 edtech tools, but this month I decided to do a spin on the normal screencasts.

This episode features 5 edtech books to read this summer! I won’t be creating a new episode in June or July, so I thought I’d share some of my favorite edtech books and some books on my own to read list.

5_in_5This episode features the following books:

  1. Untangling the Web
  2. Web 2.0: How-To for Educators
  3. Flip Your Classroom
  4. Out of Our Minds: Learning to be Creative
  5. Digital Leadership: Changing Paradigms for Changing Times

For the videos, the Prezi, Diigo links to all the books featured in the episodes and more, visit my website. If you don’t want to miss another episode, subscribe to the iTunes podcast channel here.

Tech To You Later!
Katie

Lunch & Learn: Teachers Spotlight EdTech Successes

April marked the last of this years monthly Lunch & Learns, where teachers were invited to bring their lunch to the library during their lunch bell on a designated Thursday each month.  I wanted the last session to spotlight some teachers throughout the building, and allow them to present some of their edtech success stories.  I’m happy to say that I had trouble narrowing it down to 4-5 teachers from each lunch bell!

lunch and learn informationTeacher presenters ranged from 5 to 40 years of experience teaching, and the tools they presented on also ranged in tech-ability level. I asked teachers to answer the following questions in an 8-10 minute presentation of the tool.

  • What was the activity/project and how did you decide on having students use this particular tech tool? How was this different than the traditional project/activity you previously used? How would you change the project for future use?
  • How much were you involved with setting up the technology portion of the project for students? How long did it take? How difficult was it?
  • What were the results? How did this improve/enhance student learning? How did the students respond?
  • If there is an opportunity to quickly interact with your tech tool, I’d like to do that with the teachers.

I filmed each of the teachers’ presentations and uploaded them into the corresponding Lunch & Learn resource folder on Schoology.  Teachers asked the presenters a lot of questions, and there was a lot of great brainstorming going on.  I know some teachers have already implemented some of these tools after seeing them presented at the Lunch & Learn.  A brief summary of each of the highlighted tools are below.

Word track changes/review tools– Word has a handy feature that allows you track your and student changes, add comments and more. This is a great way to grade papers, so your students can easily see all your comments and suggested changes. It’s also a great way to see peer-editing progress.

Screencasting– Screencasting records whatever you’re doing on your screen and you can also record your voice giving instructions. Screencast-o-matic (screencasting tool) allows you to download your video to your computer or upload your video to the their website or YouTube and share the link with anyone.

VoiceThread– VoiceThread is like an audio discussion board. You can upload a picture or even a PowerPoint presentation and record your voice over each slide. Students can create audio comments on each slide too. Both you and the students also have an inking option that is recorded/played back as you speak as well.

Weebly– Weebly allows you and your students to create websites/portfolios. It is an extremely easy platform to use. There is also a blog feature. You can manage your students sites and they can be password protected.

Symbaloo– Symbaloo is a visual bookmarking site. It’s an easier way to keep track of all your favorites and website resources for students.

Kahoot!– Kahoot is an awesome, interactive, quiz game. It’s similar to a BDubs trivia game; the less time you take to answer the questions, the more points you get. You can download the results to see what each student answered, how much time they took, etc. It’s really easy to set up and the kids LOVE it!

Wikispaces– Wikispaces has a great educational side to their wiki platform. Wikis are a great place for students to complete group work because you can track all the changes they make and students can work on the wiki from anywhere-they don’t have to be together. They have a project side to the wiki that allows you to put students into groups, and only those students have access to their group pages.  Wikispaces was highlighted at a Lunch & Learn earlier in the year and caught this teacher’s eye to implement.

Blogs– Our creative writing teacher showed off her student created blogs in WordPress and how she manages them.

Minecraft– Our Latin teacher talked about how letting his students use a tool they were comfortable with (and he was not) transformed an okay project into a really awesome experience. His students researched important buildings and places in Roman/Latin history.  Previously they had to create the building out of a clay, a diagram, a drawing, etc.  He allowed his students to use Minecraft and was blown away by the detail they were able to put into their creations.

Read about all the Lunch & Learns this year by clicking here. How do you spotlight teachers and encourage teachers from different subject areas to engage in conversations about best practices together?

Tech To You Later!
-Katie

5 EdTech Tools in 5 Minutes: Episode 6

It’s that time again: time for the next episode of 5 EdTech Tools in 5 Minutes (okay, okay, less than six minutes).  By no means are these five minute episodes a comprehensive overview of the tools, but it should be enough to let you know what the tool is, what it can do, and if it’s worth your time looking into and learning more about.  I’m all about helping teachers save time where they can!

5_in_5This episode features the following tools:

  1. OneTab
  2. Weebly
  3. Google’s search by reading level feature
  4. IFTTT
  5. Symbaloo

For the videos, the Prezis, Diigo links to all the sites featured in the episodes and more, visit my website. If you don’t want to miss another episode, subscribe to the iTunes podcast channel here.

Tech To You Later!
Katie

Twitter Chat Key

Every chance I get to tell someone about the benefits of Twitter for an educators’ PLN, I take it.  Twitter has truly become my go-to source of real time ideas, feedback, Q&A, etc., which allows me to connect with people from all over the country and the world.  This is mainly a result of Twitter chats. In my opinion, Twitter is honestly the world’s best faculty lounge!

The biggest difference between a Twitter chat and just using a #hashtag in a Tweet is the chat takes place (usually for one hour) at the same time and day of the week every week (or every other week/once per month).  During this hour, people are actively on their device, looking at the feed of tweets using the hashtag.  You can do this by clicking on the hashtag in Twitter, which will create a feed of all tweets using that hashtag. You can also set up a search column in TweetDeck for the hashtag, which is essentially the same thing but is much easier to manage, especially in a very active chat. In order to keep the conversations connected, every participant includes the hashtag somewhere in each tweet.  Anyone can use the chat hashtag throughout the week to connect with like-minded people, just know you’ll receive the most interaction during that designated chat day and time.

Last year, I led our faculty in professional development for Twitter.  Last night I was participating in #edtechchat, when I received a notification from one of my teachers. She was participating in a chat on her own- I was really proud of her (go, Katie!) and excited to see another teacher reaching out, trying new edtech things, and growing!

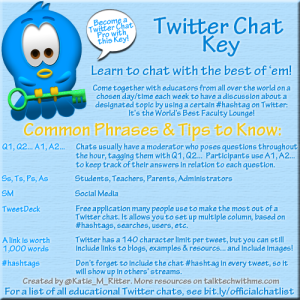
twitter chat keyShe sent me a message and asked what is all this Q1, Q3, A1, A4 stuff? I was immediately taken back to the days when I first started chiming in and participating in Twitter chats.  Catching on to all the character-saving lingo took some getting used to, and I still find myself Googling certain abbreviations every now and then to stay in the know. This inspired me to create the image in this post using Photoshop for a quick key/legend of some commonly used lingo.

If you’re interested in more resources for teachers to build their PLNs and classroom ideas using Twitter, check out my Twitter resources page. Cybraryman also (always) has some great resources you should check out, too.  And of course, for a comprehensive list of educational Twitter chats, check out this list.

So, what popular Twitter chat terms did I miss in my key? How have you found Twitter chats helpful?

Tech To You Later!
Katie